
White Mage Rikku Staff:

This is a tutorial of how I made my very first prop. First of all, I don't work with power tools. I don't have the equipment or the skill, and I'm pretty sure I'd cut some fingers off! Cutting wood into shapes isn't an option for me unless a friend does it for me. I'm sure many of you have a similar problem, so here is just one of the many methods to get around that.
The basic idea of how to create this prop can be applied to many similar things, so I hope this will be helpful for more than just Rikku cosplayers out there!
If you have any questions about the main materials I mention, please check out the Materials 101 tutorial before emailing me about them. :)
Materials you'll need:
- 10 or 12 gage wire (steel or aluminum)
1. Cut a fairly long piece of wire from the spool with the wire cutters, and bend the wire to the rough shape of the staff with your hands. (You'll just need to estimate according to how big you want the staff head to be). Don't worry if you don't cut enough, you can always tape pieces together with duct tape as you're working with the shape! Do all of the fine bending at the corners with needle nose pliers. Basically, do what works best for you to get the shape the way that you want it to look. Everyone has a slightly different way of doing this type of thing!
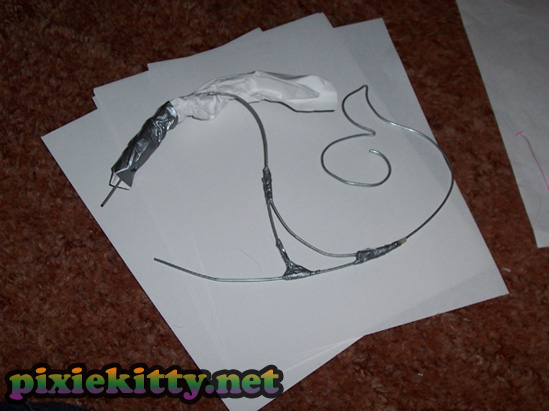
2. After you are happy with your base shape, it's time to attach it the dowel rod and give it some thickness. The cheap and easy way to accomplish more thickness is to start rolling newspaper around the wire and using masking tape around it to keep it on - this makes a thicker base so the staff will be lighter and not pure clay/plaster. Use a hardy amount of duct tape to attach the head of the staff to the dowel rod.

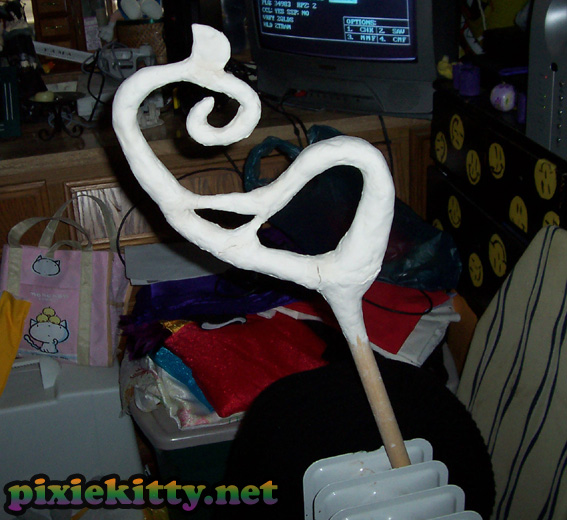
3. It's time to add the Ridged Wrap! 1-2 layers should be enough to get the sturdiness you need. Cut the strips of Rigid Wrap into thin pieces and work it around the shape. Be sure to wrap it around the part of the dowel that connects to the staff head also!
** If you want to save a little money, you can replace the Ridgid Wrap with homemade paper mache (newspaper strips dipped in a mixture of water and paste/glue). It will take several more layers of paper mache to get a sturdy shape than with the Ridgid Wrap, and each layer much dry before the next one is applied. I personally prefer the Rigid Wrap, since it dries pretty fast, takes less time, is less messy, and I think it's much more sturdy.
For either material you choose, this part needs to dry COMPLETELY before moving on to the next step. Let it set for at least 2 hours, and if it feels damp to the touch at all, let it dry for a few more hours or even overnight. The drying time depends on how wet you got the pieces, humidity, temperature, and multiple other factors. If you're impatient, you can speed up the process with a hair dryer.
The next step involves adding the Paper Clay. If the base is still damp, it will have a hard time drying from the inside out, and may not fully harden to give you the durability you need beneath the clay.
4. After everything is 100% dry, start putting Paper Clay over the base (see materials 101 for Paper Clay tips!). Again this must dry completely, and it will probably take overnight with this much clay.
5. SAND like a fool. I find it saves time to start with a more rough grain sand paper to get the big bumps out, and then with a smooth grain sandpaper to get it oh-so-smooth and nice! Another thing to note here is that you may need to sand, then reapply clay to little imperfect spots or dings, and then sand again after it's dry. How many times you do this depends on how smooth and flawless you'd like the prop to look.
6. After you have all the clay smooth and you're pleased with how it looks, you can add little risen details for some extra pizzazz! In the photo below, you can see that I added some risen detailing around the bottom of the staff head. I also added two strips of 6mm foamie along the handle to get those two silver risen parts as seen in the reference photo. This is up to you, but I think it looks much better than just painting the detail on.
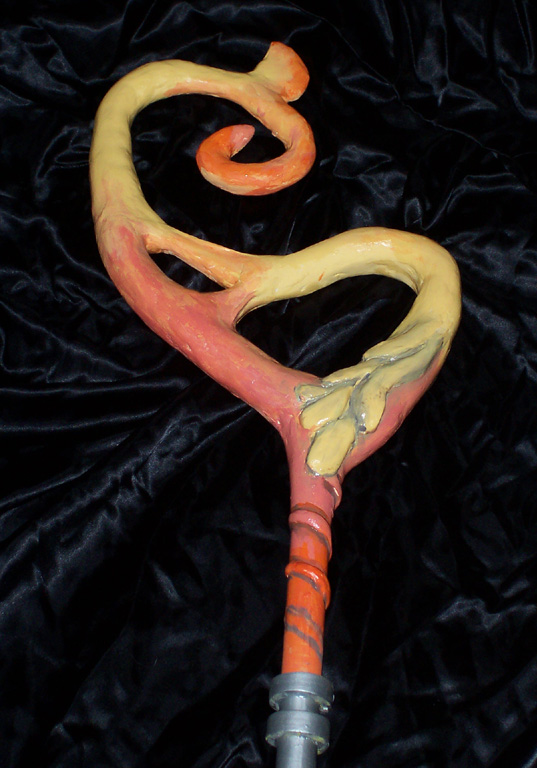
7. After all of the clay is dry, and you're happy with how everything looks, you can't begin the process of painting. I like to cover the entire staff head in several coats of medium thickness acrylic gesso. This isn't required, but it helps me to see imperfections that need to be sanded more or filled with clay. It also helps to even fill in some minor dents and imperfections. After the layers of gesso are all dry, I give it all one more sanding with a fine sand paper, then I paint it with acrylic paints. Your paint job can really have a dramatic effect on the final look of the prop. Dry brushing black paint or outlining the details in a darker paint color really helps it to pop out in photographs.
8. The final step is to cover the staff in a finish. For this type of thing, I personally prefer a semi-glossy finish. Be sure that you use acrylic gloss, as other types of paint (such as spray paint) can react with the acrylic paint and make it sticky forever.You have the choice of using a non-gloss, semi-gloss, or glossy finish. Paint several layers of the finish on - it will look nice and helps protect your paint job from chipping.